Search This Blog

Sunday, November 6, 2011

It's a Cinch again...


Here’s a quick tutorial. This may be very handy for those of you who have my Twirl Skirt pattern and you’re looking for an easy way to cinch up the side. As I said in my last post about skirt cinching, I prefer to just fold it up by hand and add a bow or other embellishment. This method is pretty simple though, so give it a go!


What you’ll need
A finished skirt or other project that needs a little cinching
1/8” elastic: white for light fabrics, black for dark fabrics
Thread that coordinates with your skirt
Your sewing machine


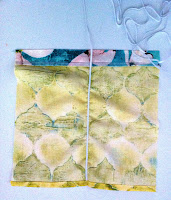
I am using a mock skirt in the photographs. The Yellow is the skirt and the blue along the top is the waistband. You will need a length of 1/8” elastic that is at least a few inches longer than the drop length of your skirt, or a few inches longer than the length you would like to cinch up. An excessively long piece is fine, there’s no reason to cut it yet. Begin by attaching the elastic to the underside or, the wrong side, of your skit in the spot you want to create a cinch. Tack the end of the elastic at the hem line with a straight stitch. Be sure you back stitch.


Now, change your machine to a zigzag stitch and set it to full wide and about a medium stitch length. Zigzag over your elastic, taking care not to stitch into it, until you are within 1” of your waistband or where ever you would like to stop.


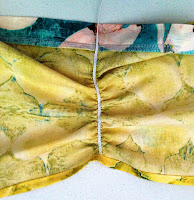
Hold the hem of your skirt in one hand and the long end of your elastic in the other hand. Pull the long end of your elastic until you achieved your desired amount of cinch. Finish by tacking down the long end of your elastic with a straight stitch and trimming off the extra. Add a bow or add nothing at all. Hit the elastic with some steam for a little extra bounce and stretch.

Friday, November 4, 2011

So You Think You Can Sew

A friend told me about this contest and I thought it was a great idea! So, I am going to enter my favorite creation, the Belle of the Ball Gown. I mean I couldn't help but notice that one of the prizes for first place was $100 to The Fat Quater Shop followed by Fabric Shoppe and Raspberry Creek Fabrics. If you know me, you know I love fabric, it's the reason I sew. The rest of the prizes are PDF style tutorials from some well known designers. I am sure many of you would also be thrilled to win these prizes. So, I'd like to encourage you to enter! If you enter something you've made using one of my tutorials, I will give you any one tutorial of your choice designed by Tenderfeet Stitches. If you make it to the top 12, I will give you any 10 tutorials of your choice designed by TFS.
I have seen so many beautiful creations from all of you that I encourage you to share them, to enter and to show off your sewing skills!


Please note that Mommybydaycrafterbynight is the host of So You Think You can Sew. My contest, contained with in this blog post, is not associated with her or her contest. I am simply promoting So You Think You Can Sew and encouraging my readers to enter using my own PDF patterns. Mommybydaycrafterbynight is not responsible for my contest, just as I am not responsible for hers.

Monday, October 17, 2011

Monthly Giveaway

I’m going to borrow an idea from one of my favorite people, Jaimie from Because of Leah. I love hearing from the people who purchase and use my tutorials. I especially love seeing what you create. So starting now, every month I will give away one TFS tutorial to a lucky person. All you have to do to enter is comment, post or like something on Tenderfeet Stitches Facebook wall or BLOG. Obviously, the more times you communicate with me the higher your odds of winning. I will randomly select a winner each month and that winner can select any tutorial in my Etsy shop free of charge. I look forward to hearing from ALL of you! p.s...the Malibu Mega Ruffle Dress could be yours for free, it debuts by the end of the month!

Sunday, October 9, 2011

Make me Petti Please

It’s a proven fact, pettiskirts make people happy, they make people smile. Every girl needs one, whether young or old. So, if you’d rather make one than buy one, you may find the included information and links very helpful. The most basic things required are:
Time
Patience
Other than those two essential things, Martha Steward and Kandi Lightner of Kaiya Eve Couture do a fabulous job showing us how to make the world a little bit fluffier. When selecting your chiffon, you need to obtain nylon chiffon, as it does not fray when cut. I suggest purchasing it in rolls to eliminate hours upon hours of cutting strip after strip. You can find these rolls here. I have never purchased from this company, but this is what you are looking for.
Be sure you watch the video on the left hand side of Martha’s page. If you have any questions about shirring, please visit this page and watch the video as well. I have also known people to use regular gathering techniques or a ruffling foot. So, shirring is not the only way to gather for this skirt.
Good luck and have fun with it. If not, go buy one! If you're looking for some thing beautiful to compliment your new petti, visit my shop and take a look at my princess dress patterns.

Thursday, September 22, 2011

Who's Behind TFS?

Considering I have had the privilege of meeting so many people through Tenderfeet Stitches, I thought I should share more about myself. I am Amanda, the motivation behind TFS. My love for sewing began when I was just a child and my mother made me the perfect little 80's play outfit with what I dubbed an "air conditioning" built in. It had this atrociously cute feature of knotted bows adorning the back. I was so proud to wear that get-up and explain to everyone, whether they asked or not, the true function of the open back design. At this young age I wasn't allowed to use her Phaff machine or the antique Singer with it's big wheel and peddle, but I was intrigued by how they worked and how they helped her make such lovable things. I took up a needle and thread and would go to work on scraps of fabric with shoddy embroidery work. After high school, I joined the United States Air Force and one of my first larger purchases was a sewing machine and enough fabric to look like a hoarder. I didn't even own a cell phone or a computer yet. I went to work on a quilt I never finished, but many more successful projects followed. After marriage, came our baby girl. When she was born I took up sewing children's clothing. I wasn't very good at it because I am a bit stubborn and prefer to learn things the hard way. Within a few years I had it down to my own science and was on the hunt for better patterns. When I couldn't find what I was looking for I began the journey of designing my own. It has been a thrilling journey, one in which, I have met some amazing people. I opened Tenderfeet Stitches on Etsy as soon as I discovered the existence of such a fabulous DIYer's haven. Since then, I have started teaching classes at a local fabric store, The Quilter's Market. I really love sharing that feeling I get when I successfully complete a garment. I can only hope that my children will discover the same joy and love within the things I create and that I can pass on the tools to others so that they may share such feelings with those they love.
Aside from sewing, I am a dedicated wife of many years and a mother of two. I have been blessed with both a daughter and a son who fill my days with only the joys young child can deliver. I work full time as a circuit board repair technician on avionics equipment and a repair supervisor. I am proud to have served my country through military service and be a veteran of foreign wars. My hobbies beyond sewing include anything outdoors, camping, quad-riding, cooking, baking, crocheting and reading a good book...and you likely won't find we anywhere without my iPhone, unless I'm camping in the middle of no where, Arizona.

Thursday, August 25, 2011

Belle of the Ball Gown Prerelease PARTY!


Do you want to win $50 worth of Tenderfeet Stitches tutorials? I'm changing it up a little...you could win a $50 gift certificate for use in my Etsy shop! One lucky person will win! Here’s how to enter...


Find a photograph of a garment you have made using one of my tutorials.


Post this photo on my Tenderfeet Stitches Facebook wall and say which tutorial you used.


Share the photo with all of your friends and family to get as many “Likes” as possible.

Don't forget to ask your likers to like my page as well!


The person who posted the photo that obtains the most “Likes” will receive the tutorial prize pack. I will close the contest at 11:59 pm EST Monday, 5 September 2011. This contest is in no way associated with or the responsibility of Facebook or Etsy. Any and all questions and concerns should be directed to Amanda at TenderfeetStitches@gmail.com.
Any entries that are not made from a tutorial purchased through my Etsy store by the poster will be disqualified. Comments on the photograph do not count toward the total of “Likes.” The only number I will use to determine the winner is the number of people who have “liked” the photograph via Facebook. The gift certificate is not valid for use on sale packs, only full price tutorials.

Wednesday, August 17, 2011

It’s a Cinch!

One of my favorite tutorials is the Mommy and Me Twirl Skirt. Not only is it amazingly simple and FAST, it also gives you the tools you need to make a one of a kind skirt in a zillion different sizes, lengths and layers. Okay, maybe not a zillion but I bet if we did the math it would be close enough to round. When I make the twirl skirt with a second layer (or more), I like to pinch up the top layer and tack it into place with a couple stitches or with a pin. Then, I attach a fun accessory and voila I have a cute little peek a boo skirt. Lately, I have noticed the use of another technique which seems to be gaining popularity. I prefer the simple pinch and stitch myself, but since I’m in the how-to business I’ll do my job! I haven’t a clue what this is called but here it is…


Here’s what you’ll need:
Your finished skirt
A length of about 1 ½” satin ribbon (suggested)
A length of ¼”- ½” ribbon (suggested)
A small sized safety pin
Your sewing machine
Scissors
Fray check

A few tips!

I am using a piece of fabric with a hemmed bottom edge and a red waistband along the top. This is only an example for the tutorial, you will be adding this to your skirt or whatever else interests you. For the ribbon, I prefer satin because it is light, yet durable and soft. You may use any type or ribbon of various widths. The length of your 1 1/2" ribbon will be and 1" shorter than the length of your skirt panel. The length of your 1/4"-1/2" tie ribbon will be about 4 times the length of your skirt panel. You can be the judge of the exact length once you have completed the process.


Begin by cutting your wider ribbon 1" shorter than the length of your skirt and finish the raw edges with a serger or an overcasting/overlocking stitch.


Next, place your wide ribbon onto the back side of your skirt panel with one of the finished ends just inside or above the hem line. Make sure your ribbon is pinned into place, laying flat and straight. Sew up both sides, about 1/4" in from each edge of the ribbon and then sew down the center of the ribbon. You have three stitches (red lines) running down the length of your ribbon, creating two tubes that are open at both ends.


This is optional, but you may add a small loop to the underside of your skirt to use for anchoring the tie ribbon. This comes in handy if you don't want the tie ribbon to show on the outside of the garment. Simply clip off a short piece of the small ribbon and fold it into a loop. Finish the raw ends and then attach it to the underside of your skirt along one of your previous stitch lines. I used about 1" of the smaller ribbon and attached it about 1" up from the hem line.


Clip the safety pin to one end of your smaller tie ribbon. Insert the safety pin into the bottom opening of one of your tubes. Work the safety pin up and out the top of the first tube. Then into the top of the second tube and down and out the bottom.


Tug on your tie ribbon until both sides are of equal length. Slide the skirt up so that it gathers to the length you'd prefer. Tie the ribbon into a bow or attach it to the loop on the underside of your skirt.


Voila! You have a peek a boo skirt!

Saturday, August 6, 2011

I can't say it enough...Thank You!

Tenderfeet Stitches has brought with it the opportunity to meet many people. Some of them make me laugh and smile while a small few simply make me wrinkle my brow. I have made friends that support and encourage me and I feel very blessed to have them all in my life. Many of the people I have met are amazingly talented, helpful, kind, encouraging, honest and inspiring. Their support keeps me going through my most difficult days and pushes me onward when I’d rather just wedge myself behind the washing machine with that shamefully unfinished pettiskirt my daughter has already outgrown. At the end of the day, I take a moment and I acknowledge where I am, how I’ve gotten there and who has helped me along my way. I think of my family, friends, customers, editor, accountant, testers and photographer. Yesterday was a big day for me, as I checked my inbox I found the gold at the end of the rainbow. Way better than the cutest leprechaun in make-believe land adorn in Tenderfeet Stitches attire, I discovered the sparkling awe of Erica Finnan and her astounding talent. Every single time I see her photographs I think she has hit her summit until I see the next one and realize her talent will only continue to soar. She is a kind and extremely talented woman and I am truly grateful to share my journey with her. She makes my designs shine in a way I could never and her little models are adorably angelic. Thank you so much Erica, for another round of fantastic photographs and for all the effort you put into making them beautiful. Thank you to everyone who has and continues to support me along my little journey.

Friday, July 22, 2011

Share the Love Giveaway!

THIS CONTEST IS CLOSED!
Thank you to all who participated. The winner is Miriam!

I've hit 500 Facebook fans and I'm thrilled! Make new fans equal money for you to spend! For every single new fan I receive over 500, I will add $1 to the gift certificate value one lucky entrant will receive. Here’s how to enter:

Tell your friends

Share my Facebook Page

Favorite my items on Etsy

Add my Etsy shop to your favorites

Pin my Etsy shop and items through Pintrest

Tweet about my Etsy shop and items

Like my Etsy shop and items

Write about my Etsy shop on your own blog


The more things you do the more fans I will (hopefully) get. Comment below or write on my Facebook wall to let me know you have been telling your friends and what you intend to get with your certificate to be entered. I will draw the winner randomly at 11:59 pm EST Monday, 25 July 2011. This contest is in no way associated with or the responsibility of Facebook, Etsy, Pintrest or Twitter. Any and all questions and concerns should be directed to Amanda at TenderfeetStitches@gmail.com
Don’t forget to check out my blog post about The Beads of Courage Bag Project, there’s a free tutorial!

Monday, July 18, 2011

Beads of Courage Bead Bag

One of the first developmental milestones any parent looks forward to is that first smile. Many of us beg for it by making goofy faces or noises, singing songs, reading books, giving endless kisses and hugs. In that moment, when their lips begin to crease upward, we feel recognized, validated and loved. Those feelings continuously resurface throughout parenthood as our children grow. Whether it is us making them smile or even an outsider, it brings us joy to know that our children are happy enough to smile.
Recently, my design endeavors brought me into contact with a very kind and wonderful woman. I uncovered her story and felt moved to take up her cause. My children are my life, without them I would flounder like a fish out of water. Their sadness, tears and struggles are my sadness, tears and struggles. I feel their pain very deeply just as I feel their joy within my own heart.
To me, it is important to share smiles not only when times are good, but even more so, when pain and struggles are at their greatest. This is why I decided to sew bead bags for Beads of Courage. This local organization provides innovative, arts-in-medicine supportive care programs for children coping with serious illness, their families and the health care providers who care for them. They bring smiles for children and their families when they need them most.
I am hoping that my tutorial will enable more people to create bead bags for this organization and, quite possibly, raise awareness of the need for more smiles, support and encouragement as these children fight the battle for their life against serious illness.

Bead Bag Tutorial by Tenderfeet Stitches

The hat in the photograph was made by Because of Leah

Wednesday, July 13, 2011

Charlotte-Rose Princess Dress Release Party


This contest is closed!
If you won please contact Amanda TenderfeetStitches@gmail.c​om
The winners are:
Trims and Things MICHELINE!!!
EmmilluArt $15 gift certificate CHRISTINA LADIEU!!!
Becasue of Leah $20 gift certificate HOMESCHOOLMOMOFSIX!!!
Tenderfeet Stiches Bubble Dress DIY/SIY Kit AMBER WIRTH!!!
Tenderfeet Stitches $25 gift certificate MEPLUS3!!!

if you do not contact me within 48 hours the prizes will be passed along. Thank you everyone for entering and congrats!


The long awaited and eagerly anticipated (at least by me) Charlotte-Rose Princess Dress is LIVE and up for sale in my Etsy shop! To celebrate with probably a little bit too much fanfare, I’m giving some stuff away for FREE!

What’s up for grabs?
Goody bag full of vintage and older stock trims and lace from Legacy in Linens
$15 gift certificate to EmmilluArt
$20 gift certificate to Because of Leah
A DIY Sew it Yourself Pink and Yellow Bubble Halter Kit from Tenderfeet Stitches
$25 gift certificate to Tenderfeet Stitches


Here’s how to enter:


1) Go to each Etsy shop (links above by each prize) and hit the Tweet and/or the Facebook Like buttons, then come back here or go to my facebook wall and tell me which ones you hit. One entry for each and every hit; that’s as many as 8 entries!


2) Go to EmmilluArt, Because of Leah and Tenderfeet Stitches on Facebook and “Like” their pages. Each like gets you an entry. You may either come back here and tell me which ones you liked or simply post it on my facebook wall. That’s as many as 3 entries.

This contest will end on July 20, 2011. This contest is in no way associated with or the responsibility of Facebook, Etsy or Twitter. Any and all questions and concerns should be directed to Amanda at TenderfeetStitches@gmail.com

Saturday, June 18, 2011

Making a Rolled Hem…without a sergeror a rolled hem foot

This one is for Amy. She’s a novice and I encouraged her to take the plunge and give it a try. So, she made a list of everything she needed to make a couple of Twirl Skirts for her adorable little girls. She placed a few orders online for fabric and elastic, along with a rolled hem foot. We made a few adjustments to the pattern/tutorial so that she could make a longer skirt and traded a couple million emails back and forth. Tragically, the elastic arrived in the wrong size, so we had to make a few more adjustments. Expectantly, her rolled hem foot was in transit somewhere between China and Uranus. So, I told her to try a zigzag stitch to finish the hem.
I tell you this little bit because often times it isn’t the actual sewing that becomes the challenge, but rather the logistics. Fortunately, once you get that matter sorted out, and read your machine manual, everything else seems to fall into place quite easily.

Once again, I will recommend The Dressmaker’s Technique Bible by Lorna Knight for all sewers, novice and pro, alike.

Now, if you ever find yourself creating a garment from a circle, like the Twirl Skirt found in my Etsy shop, you will be begging for a way to finish the hem without an iron. The easiest way is to roll the hem using a serger. If you don’t have a serger, you can check and see if your machine has a rolled hem foot or if there is a suitable one for sale on the market. You may also try using a zigzag stitch to finish the hem.
So, follow along with the photos as you read through the steps. I hope you enjoy this one, I’m sure many folks out there will find it very handy!


1)You have a piece of fabric that needs a fast and easy finished edge that resembles a rolled hem.
2)Select a zigzag stitch on your machine and set your stitch length one notch above zero and your stitch width to its widest setting. Mine happens to be 0.5 and 6.0. You can choose a different length and width; this is just a good starting point.
3)Place the fabric in you machine so that when you sew, the stitch falls just off the edge of the fabric.
4)Run your stitch down the fabric. You may need to encourage the feed slightly.
5)If you would like you may run the stitch a second time to get a more uniform and secure finish.
6)This is what my fabric looked like after the second round of zigzagin’.
7)This is the rolled hem of my skirt, done with a serger, just so that you may compare.

Thursday, June 16, 2011

Machine Shirring Tenderfeet Style


This is such a fun and easy technique that too many people find initially intimidating. Take heart, the web is full of how-to tips, free, affordable and adorable tutorials, videos and information. I have read a great deal on the subject and applied it time and time again. So, I decided to compiled the included information for my followers, in particular Pamela ;). Enjoy, and feel free to add your own tips and information in the comments section.

It’s as simple as this...


What you need:
Your sewing machine
Regular machine sewing thread
Elastic thread (you can usually find this in the elastic section of your craft store)
An empty bobbin
Fabric


A few things to consider:
Every machine and every person sews differently. You will likely need to spend some time practicing on scrap fabric until you find that sweet spot. Different weaves and weights of fabric gather differently. A satin fabric will gather more readily than a denim. When considering how wide your fabric should be, a simple rule to follow is 1.5 to 2 times wider than the desired width of your completed project.

So here we go and remember, it’s easy!

1) Begin by loosely hand spooling the elastic thread onto your bobbin. Be sure you go in the same direction that your machine does when it spools the bobbin automatically. Also, take care not to stretch the thread.
Some have had better success letting the machine spool the thread, possibly because it adds just a little bit of tension. I have tried this and seen little difference. To do this, I began by spinning a little bit of elastic thread onto the bobbin. Then, I placed it onto my machine, just as I would when spooling regular thread. I held the elastic in my hand and began spooling; taking care not to put too much tension on the elastic.

2) Load the bobbin into your machine as you normally would when you’re about to sew.

3) Set your straight stitch length to its longest setting.
Some have had success with a normal stitch length and still others, somewhere in between. This is where you have to play around with your machine a bit to find that sweet spot. Adjust your stitch length and tension until you gain the desired results.
For me, I set my machine to a standard straight stitch and adjust my length to a 6.0.

4) Starting at one end of your fabric, run a stitch down the width to the other end. Make certain you backstitch several times at the beginning and end of your shirring stitches. Also, do not pull your fabric through the feed. You don’t want to stretch the elastic thread. I will admit that I do, at times, encourage my fabric through the feed. The important thing to consider is if you put too much tension on your elastic thread, it may break with use.
Some prefer to knot the thread tails by hand, instead of backstitching.

5) Add as many rows of shirring stitches as needed to achieve the desired results. The distance between each stitch row can vary, depending on your project. The closer your rows and the more you add, the more your fabric will be drawn in. If you have many rows close together, you may begin to lose your stretch. So, the size of your project is directly proportional to the distance between each row!

6) Place your project on the ironing board and hold your iron over the elastic, not touching, and let loose on the steam button. This will make it shrink up, giving you more ruffle and stretch. The same effect will be achieved in the dryer, the first time you launder. So, if your project doesn’t seem to have gathered quite enough, add a little heat and watch it retract a bit more.

For a simple project to hone your skills give my free sun hat tutorial a try. If you think you’re ready to move on to something a bit more entailed, search the web for free dress tutorials or check out my Etsy shop. I offer several adorable and easy to make patterns at affordable prices.

Saturday, June 4, 2011

The Name Game

Well, in light of several current events, I am moving the name game for my upcoming tutorial onto this blog. I have selected many of my favorite suggestions and just ask that you comment below with your favorite(s). You may choose up to three names. If you are having trouble commenting, simply email your choices to Tenderfeetstitches@gmail.com. The winning name will become the name of the pictured dress and the contributor will receive the completed tutorial free of charge. Thanks so much for helping me decide and following me to my blog. Voting will close when I finish writing the tutorial, within the next week.


Please choose no more than three (3) names.


Mandy Carey Sweet Sassafras
Leah Curran Picnic in the Park
Courtney White Martin Sweetheart Dress/Top
Abbie Simpelo-Dyer Tallulah
Little Tickle Boutique Bella Rose
Pamela Bell The Meadow Brooke
MaukyJo Shoulder Tie Apron Dress/Top
Jheri Jordan Heart of Dixie
Jheri Jordan Shabumpkin Summer Dress/Top
Micheline Nadeau Fairbank Little House on the Prarie Summer Dress
Amber Wirth Mommy's Little Helper

Votes via email

Mommys little helper
Little house on the prairie
The Meadow Brooke

Wednesday, June 1, 2011

Finishing Your Seams! Without a Serger…

This is part 2 of many posts containing valuable sewing tips! I’m going to assume that most of the people who purchase my tutorials know how to or will figure out how to turn on their machines and thread a needle, so I will begin with a straight seam and finishing. If you have any questions or suggestions, feel free to comment below.


Now, remember seam allowances may vary; I always use 3/8”. So, you will begin by placing two pieces of fabric, right sides together and running a straight stitch 3/8” inside of the edge. I like to run my straight stitches at a stitch length or three. Play with your lengths until you find one you prefer; usually, somewhere between 2.5 and 3.5.I will cover two finishing methods, but keep in mind, there are several more. These are simply simple.


Pinking
After you have sewn your straight stitch, you will use pinking shears and trim the edge of the fabric just outside of the seam.


ZigZag
Once you have sewn your straight stitch, run a narrow and short zigzag stitch along the raw edge, just outside of your straight stitch.


You may or may not choose to sew these seams down with a top stitch. Many regular machines also have an overcast stitch that will secure the edges of your fabric, much like the zigzag. It does a great job of finishing the raw edge, but it can be slow and may use more thread. The symbol looks something like these, but consult your machine manual.


Tuesday, May 31, 2011

The Right Stuff…or What Works for Me!


This is part one of many blog entries containing valuable sewing tips! I will be teaching a couple of sewing classes this summer at the Quilter’s Market in Tucson, Arizona and thought I should share the basics with my wonderful customers as well! I know many of you are learning to sew and I’m hoping that this will all be helpful in some way, to someone. I also know that many of you are seasoned and I would sincerely appreciate any input, suggestions or advice! Simply leave a comment below. If anyone has a question they would like answered, let me know and I will do my best to provide a logical response!


I know the internet contains an enormous amount of information, but I get tired of paging through it all. So, I recommend the following book because it has all the basic information you’re likely to need when sewing clothing, it’s accurate and all in one place; The Dressmakers Technique Bible by Lorna Knight. I was lucky enough to receive it as a gift, thanks Mandy, lobes you!


Included in this post are some photos of the stuff I typically use. Most of it is very helpful to have from the beginning, but not always necessary. I am an advocate for saving money, too. So, plan ahead and save up those coupons! Make it your personal goal to never pay retail. I love Joann’s fabric, but I always use coupons. I also shop at Fabric.com all too regularly. Always do a quick Internet search for their coupons because they always have something going on. Of course there is always Amazon.com. For your machine(s) I strongly suggest that you look at a sew and vac shop! They will answer all of your questions and let you try out the machines. They might have something in your budget, they typically offer trade in values and classes. All of this will help you avoid those lemons you’ll find in big box stores.


So here we go…


Cutting tools:
Sharp scissor, use them for nothing but fabric and thread, NOTHING BUT! Pinking shears, a seam ripper (unfortunately you’ll need this) and a rotary cutter which makes cutting go quickly. Be careful you don’t cut off any body parts with this!


Measuring tools:
A tape measure, you might want one with metric on one side and “standard” on the other. Be sure it is at least 60” long. If you use a rotary cutter you’ll need a self healing mat. My favorite is the 24”x36”. Also, a larger acrylic cutting square; I use Omnigrid. The size I use most is 14”x14”.


Threads:
You’ll need regular machine sewing thread that coordinates with your fabric. Also, upholstery or clear thread for easier gathering. Maybe some elastic thread for shirring. Overlocking or serger thread spools if you have a serger.


Pins and Needles:
Machine needles, dress making pins (straight pins), hand sewing needles and safety pins. It's up-side-down but blogger is going to make me crazy if I reload it againa...


Odds and ends:
Fray check for ribbons and a fabric pencil for marking on your fabric.


Machines:
A regular sewing machine, a serger and an iron and board.


Now, remember you may not need all of these things, these are just the tools I use often enough to mention. Feel free to comment if I left something out that you typically use or find helpful!

Wednesday, May 4, 2011

Sew Super Easy Summer Sun Hat!

Okay, here’s a free tutorial for all of you ladies out there who have little heads to protect from the hot summer sun. I didn’t have much time to get creative with this but you really could do so much more. This tutorial maybe used to create items for personal use and for sale. This tutorial may not be sold, it is FREE and to remain FREE. So, off we go and I can’t wait to see what everyone comes up with!

What you need:
No more than 20" x 20" of fabric
Elastic thread
Coordinating thread
Cutting and measuring tools

Some nice things to have:
A rolled hem foot or a serger that rolls hems
Cute embellishments like lace, ribbon, flowers etc…
Fabric marker


Cutting your fabric:
Doll: 13” x 13”
Newborn: 15” x 15”
3-6 months: 16” x 16”
6-12 months: 17” x 17”
Toddler: 18” x 18”
Child: 19” x 19”
Teen to Adult (hey, you never know): 20” x 20”

Let’s get started!


1) Now that you have your fabric cut to size, you will fold it twice.
• Fold your fabric in half. Yup, in half. It looks like a rectangle.
• Fold your fabric once more, so it looks like a square again.


2)Let’s make a circle!
• Place your fabric so that the single fold is to your left, the double fold
is at the top, and the raw edges are to the bottom and right.
• Now, draw and or cut and arc from the bottom left corner up to the top
right corner.
• Unfold your circle!


3) Now, you will hem the edge of your circle.
• I strongly encourage you to roll this hem, but if you do not have a rolled
hem foot or a serger, it’s okay!
• Fold the edge under ¼”, with the wrong sides of the fabric touching, and iron.
• Fold the edge under another ¼” and iron.
• Stitch this pressed hem into place. Making a few shallow 1/8” slits along the edge may help when folding your edge.


4) Next, you will shirr, or shape the hat! Gather an empty bobbin and your elastic thread.
• Hand spool the elastic thread onto your bobbin. Be sure you go the
same direction that your machine does when it spools the bobbin
automatically. Also,take care not to stretch the thread.

• Load the bobbin into your machine as you normally would.
• Set your straight stitch length to its longest setting.
• Starting 2” in from the edge with the right side of the fabric facing
upward and sew a continuous stitch around the hat.

• Make certain you backstitch several times at the beginning and end of
your shirring stitches. Also, do not pull your fabric through the feed.
You don’t want to stretch the elastic thread.
• Add another stitch about ¼” inside the first stitch and then another ¼”
inside the last.
• Place your hat on the ironing board and hold your iron over the elastic,
not touching, and blow steam. This will make it shrink up, giving you
more ruffle and stretch. This will also happen in the dryer, the first
time you launder.


5) Finally you can embellish your hat with whatever you can think of.


******CONTEST CONTEST CONTEST******


Now that you have the know how, I’d like to encourage your creativity. I’m going to ask you to make an adorable hat and share it with me. I will then feature your custom creation on the Tenderfeet Stitches Facebook page and let the fans vote for their favorite.

Up for Grabs!
The #1 fan favorite will receive any three tutorials from my Etsy shop.
The #2 fan favorite will receive any two tutorials from my Etsy shop.
The #3 fan favorite will receive any one tutorial from my Etsy shop.

All entries must be sent to Tenderfeetstitches@gmail.com by May 20, 2011 and they must be titled “Summer Sun Hat Contest Entry” Voting will begin on May 23, 2011 and will end on May 31, 2011.