Search This Blog

Showing posts with label children. Show all posts

Monday, July 18, 2011

Beads of Courage Bead Bag

One of the first developmental milestones any parent looks forward to is that first smile. Many of us beg for it by making goofy faces or noises, singing songs, reading books, giving endless kisses and hugs. In that moment, when their lips begin to crease upward, we feel recognized, validated and loved. Those feelings continuously resurface throughout parenthood as our children grow. Whether it is us making them smile or even an outsider, it brings us joy to know that our children are happy enough to smile.
Recently, my design endeavors brought me into contact with a very kind and wonderful woman. I uncovered her story and felt moved to take up her cause. My children are my life, without them I would flounder like a fish out of water. Their sadness, tears and struggles are my sadness, tears and struggles. I feel their pain very deeply just as I feel their joy within my own heart.
To me, it is important to share smiles not only when times are good, but even more so, when pain and struggles are at their greatest. This is why I decided to sew bead bags for Beads of Courage. This local organization provides innovative, arts-in-medicine supportive care programs for children coping with serious illness, their families and the health care providers who care for them. They bring smiles for children and their families when they need them most.
I am hoping that my tutorial will enable more people to create bead bags for this organization and, quite possibly, raise awareness of the need for more smiles, support and encouragement as these children fight the battle for their life against serious illness.

Bead Bag Tutorial by Tenderfeet Stitches

The hat in the photograph was made by Because of Leah

Thursday, June 16, 2011

Machine Shirring Tenderfeet Style


This is such a fun and easy technique that too many people find initially intimidating. Take heart, the web is full of how-to tips, free, affordable and adorable tutorials, videos and information. I have read a great deal on the subject and applied it time and time again. So, I decided to compiled the included information for my followers, in particular Pamela ;). Enjoy, and feel free to add your own tips and information in the comments section.

It’s as simple as this...


What you need:
Your sewing machine
Regular machine sewing thread
Elastic thread (you can usually find this in the elastic section of your craft store)
An empty bobbin
Fabric


A few things to consider:
Every machine and every person sews differently. You will likely need to spend some time practicing on scrap fabric until you find that sweet spot. Different weaves and weights of fabric gather differently. A satin fabric will gather more readily than a denim. When considering how wide your fabric should be, a simple rule to follow is 1.5 to 2 times wider than the desired width of your completed project.

So here we go and remember, it’s easy!

1) Begin by loosely hand spooling the elastic thread onto your bobbin. Be sure you go in the same direction that your machine does when it spools the bobbin automatically. Also, take care not to stretch the thread.
Some have had better success letting the machine spool the thread, possibly because it adds just a little bit of tension. I have tried this and seen little difference. To do this, I began by spinning a little bit of elastic thread onto the bobbin. Then, I placed it onto my machine, just as I would when spooling regular thread. I held the elastic in my hand and began spooling; taking care not to put too much tension on the elastic.

2) Load the bobbin into your machine as you normally would when you’re about to sew.

3) Set your straight stitch length to its longest setting.
Some have had success with a normal stitch length and still others, somewhere in between. This is where you have to play around with your machine a bit to find that sweet spot. Adjust your stitch length and tension until you gain the desired results.
For me, I set my machine to a standard straight stitch and adjust my length to a 6.0.

4) Starting at one end of your fabric, run a stitch down the width to the other end. Make certain you backstitch several times at the beginning and end of your shirring stitches. Also, do not pull your fabric through the feed. You don’t want to stretch the elastic thread. I will admit that I do, at times, encourage my fabric through the feed. The important thing to consider is if you put too much tension on your elastic thread, it may break with use.
Some prefer to knot the thread tails by hand, instead of backstitching.

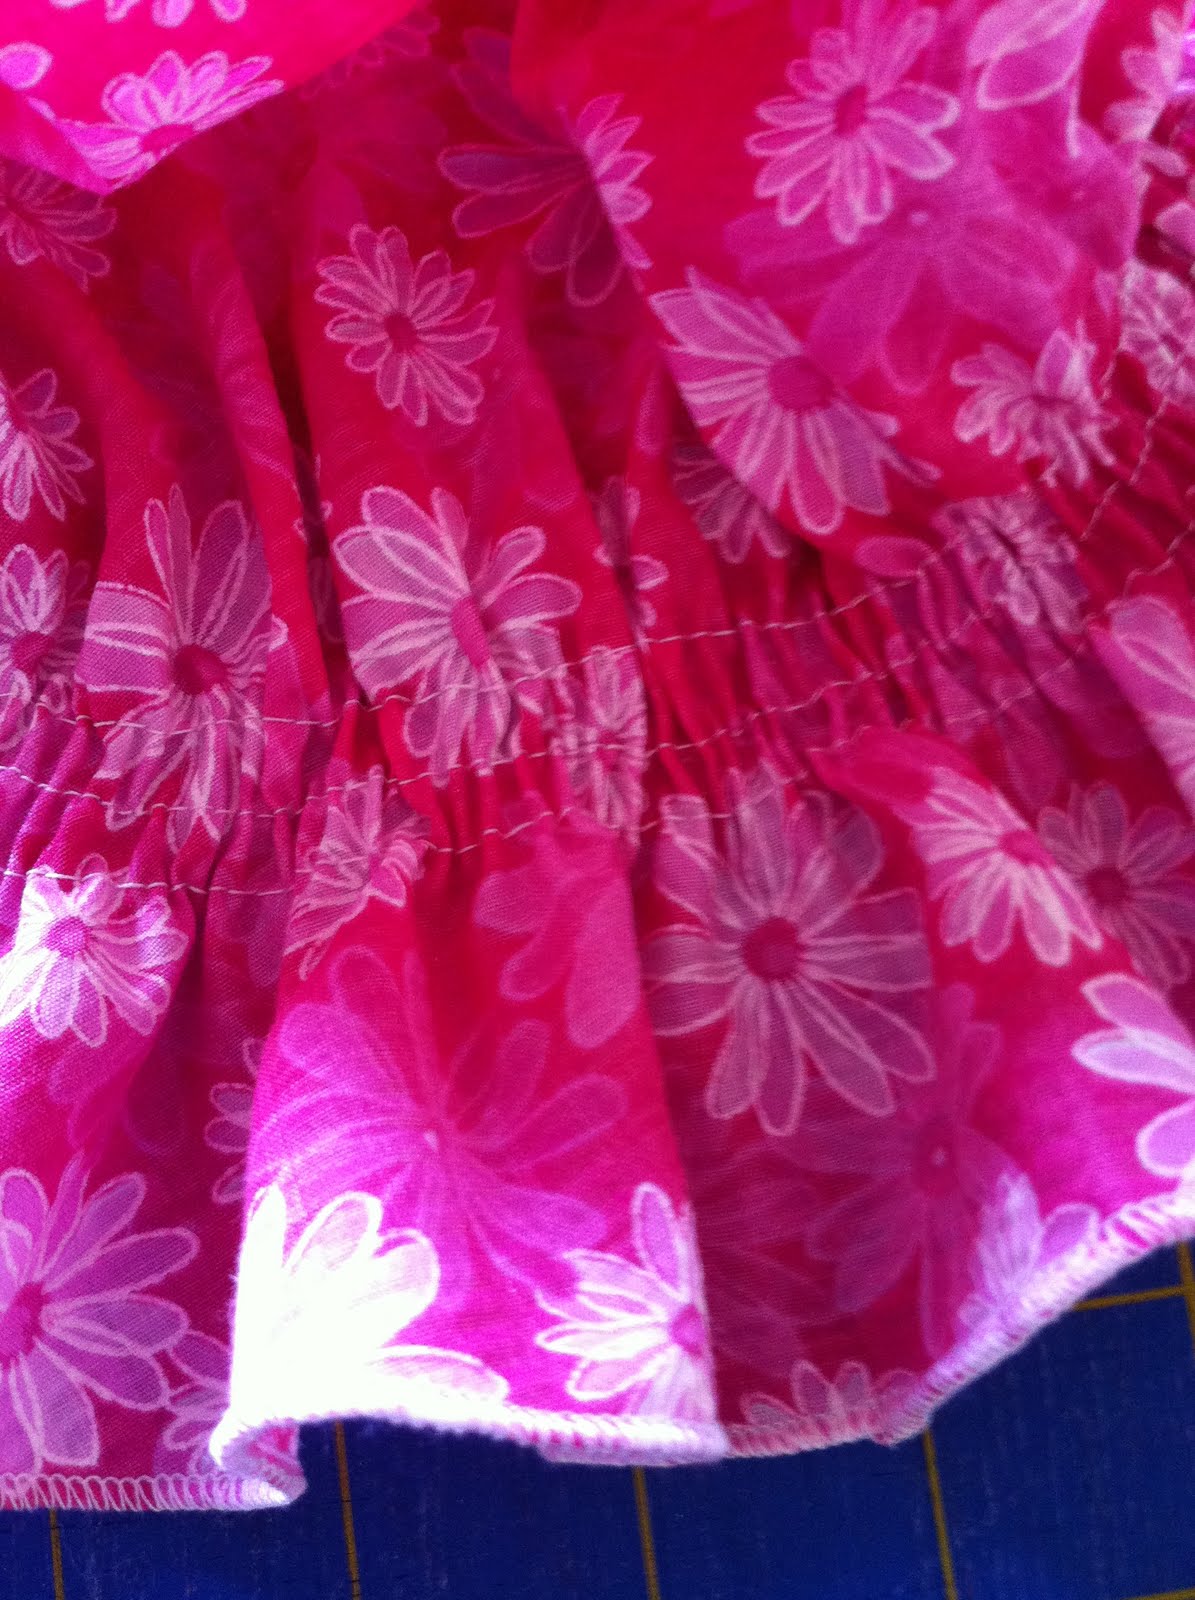
5) Add as many rows of shirring stitches as needed to achieve the desired results. The distance between each stitch row can vary, depending on your project. The closer your rows and the more you add, the more your fabric will be drawn in. If you have many rows close together, you may begin to lose your stretch. So, the size of your project is directly proportional to the distance between each row!

6) Place your project on the ironing board and hold your iron over the elastic, not touching, and let loose on the steam button. This will make it shrink up, giving you more ruffle and stretch. The same effect will be achieved in the dryer, the first time you launder. So, if your project doesn’t seem to have gathered quite enough, add a little heat and watch it retract a bit more.

For a simple project to hone your skills give my free sun hat tutorial a try. If you think you’re ready to move on to something a bit more entailed, search the web for free dress tutorials or check out my Etsy shop. I offer several adorable and easy to make patterns at affordable prices.

Wednesday, May 4, 2011

Sew Super Easy Summer Sun Hat!

Okay, here’s a free tutorial for all of you ladies out there who have little heads to protect from the hot summer sun. I didn’t have much time to get creative with this but you really could do so much more. This tutorial maybe used to create items for personal use and for sale. This tutorial may not be sold, it is FREE and to remain FREE. So, off we go and I can’t wait to see what everyone comes up with!

What you need:
No more than 20" x 20" of fabric
Elastic thread
Coordinating thread
Cutting and measuring tools

Some nice things to have:
A rolled hem foot or a serger that rolls hems
Cute embellishments like lace, ribbon, flowers etc…
Fabric marker


Cutting your fabric:
Doll: 13” x 13”
Newborn: 15” x 15”
3-6 months: 16” x 16”
6-12 months: 17” x 17”
Toddler: 18” x 18”
Child: 19” x 19”
Teen to Adult (hey, you never know): 20” x 20”

Let’s get started!


1) Now that you have your fabric cut to size, you will fold it twice.
• Fold your fabric in half. Yup, in half. It looks like a rectangle.
• Fold your fabric once more, so it looks like a square again.


2)Let’s make a circle!
• Place your fabric so that the single fold is to your left, the double fold
is at the top, and the raw edges are to the bottom and right.
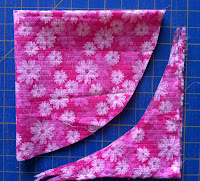
• Now, draw and or cut and arc from the bottom left corner up to the top
right corner.
• Unfold your circle!


3) Now, you will hem the edge of your circle.
• I strongly encourage you to roll this hem, but if you do not have a rolled
hem foot or a serger, it’s okay!
• Fold the edge under ¼”, with the wrong sides of the fabric touching, and iron.
• Fold the edge under another ¼” and iron.
• Stitch this pressed hem into place. Making a few shallow 1/8” slits along the edge may help when folding your edge.


4) Next, you will shirr, or shape the hat! Gather an empty bobbin and your elastic thread.
• Hand spool the elastic thread onto your bobbin. Be sure you go the
same direction that your machine does when it spools the bobbin
automatically. Also,take care not to stretch the thread.

• Load the bobbin into your machine as you normally would.
• Set your straight stitch length to its longest setting.
• Starting 2” in from the edge with the right side of the fabric facing
upward and sew a continuous stitch around the hat.

• Make certain you backstitch several times at the beginning and end of
your shirring stitches. Also, do not pull your fabric through the feed.
You don’t want to stretch the elastic thread.
• Add another stitch about ¼” inside the first stitch and then another ¼”
inside the last.
• Place your hat on the ironing board and hold your iron over the elastic,
not touching, and blow steam. This will make it shrink up, giving you
more ruffle and stretch. This will also happen in the dryer, the first
time you launder.


5) Finally you can embellish your hat with whatever you can think of.


******CONTEST CONTEST CONTEST******


Now that you have the know how, I’d like to encourage your creativity. I’m going to ask you to make an adorable hat and share it with me. I will then feature your custom creation on the Tenderfeet Stitches Facebook page and let the fans vote for their favorite.

Up for Grabs!
The #1 fan favorite will receive any three tutorials from my Etsy shop.
The #2 fan favorite will receive any two tutorials from my Etsy shop.
The #3 fan favorite will receive any one tutorial from my Etsy shop.

All entries must be sent to Tenderfeetstitches@gmail.com by May 20, 2011 and they must be titled “Summer Sun Hat Contest Entry” Voting will begin on May 23, 2011 and will end on May 31, 2011.

Sunday, August 1, 2010

Children’s Cloth Book Tutorial


I like making all sorts of stuff with my fabric scraps. This morning I decided to put together a little tutorial on making a cloth sensory book for babies and toddlers. I’m sure this tutorial isn’t perfect and things could be done in better ways, but this is what I tossed together. There is always room for improvement. I hope you enjoy it!


What you will need
Your sewing machine
Thread
Scissors
Scrap fabrics different patterns and textures
Scrap ribbons
Non toxic, baby friendly embellishments
Tips
Use a zigzag or multiple stitches to secure embellishments and ribbons, they will be tugged on!
Avoid choking hazards and long pieces of ribbon.
Consider the patterns and textures of your fabric scrap as they can add to the sensory appeal of the book.
You want to avoid toxic materials. I recommend stitching ribbon edges that may fray and avoiding fray check and other chemicals.
Have fun and be creative!


First I cut 8 pieces of fabric about 5.5” x 6” for the inner pages, 2 pieces of fabric 6" x 6.5" for the first and last pages and one piece 12”x 6” for the cover. I also gathered pieces of scrap ribbon and other non toxic and baby safe embellishments I had on hand. Add as many pages and embellishments as you like but be cautious of bulk.


Next, I attached all of the ribbons and embellishments to the appropriate pages. Be certain to place things away from the edges. You will lose up to ½” seam allowance. If you are attaching ruffles and ties to the front cover, as I did, direct them inward and sew them at the edges of the pages.


Then, I attached the first and last pages to the cover. Right sides go together and you will stitch around thefour outer edges, leaving the middle unstitched. Make sure you don’t stitch any of your ribbons and embellishments into the seam, you may want to pin them out of the way.


Clip the corners, not the inner stitch, and flip the cover right sides out.


Now you will stitch all of your pages together along three edges, leaving the inner edges unstitched. Be cautious of page placement and direction; left to right and top to bottom. Also, be sure you don’t accidently stitch your embellishments into your seams, you may want to pin them out of the way.


Again, clip the corners and turn your pages right sides out. Iron and top stitches all of your pages and your cover.


Stack your pages in the correct order and directions, with the raw edges lined to your left. You will stitch them all together down the raw edge. Clip the two corners of this stitch.


Slide the pages into the cover of the book. I slid them under the first page and tucked in the raw edge. You can also tuck them into the last page, just be sure they are lined up at the center of the cover. Run a zigzag stitch down the center of the book.


You’re done!